University hub locations.

Public transport hub locations.

Tourist hotspots hub locations.

Shopping hub locations.

Located in parks hub locations.
Here are some progress renders of both the bicycle and the locking device as we start to put together a final presentation and move for Tuesdays deadline.

Incorporating the 'finder' bicycle sharing application for iPhone and iPad use. Simple to find and free to use which gives a detailed description of the hub locations throughout the Melbourne CBD.

During installation of the iPhone/iPad application, nb: this can further be used or refined to other states need be in the future.

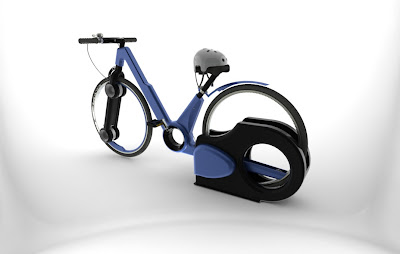
Warped angle of the final hubless featured bicycle. With helmet stored on the seat to minimise theft, as the 'thief' would look stupid riding around on a helmet!

Another perspective render showing the assembly of the pedals and the rear swingarm which is locked to the rear inner hub.

Just a taste of what is to come on Tuesday!

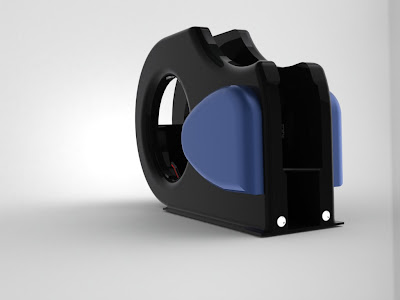
The locking device itself with two leds situated at the front of the locking device to help guide the bicycle in at night or times of dusk and dim light. The same colours have been used throughout to give the bicycle and the locking device a themed identifacation so that its clear that this belongs to the Melbourne bicycle sharing scheme. These colours also help to deter theft and damage.

The internal componenets which help to lock in the bicycle through the hubless rear front bearing. A solenoid fed pin located on either side powered by a microcomputer which also houses the internals for the optical sensors which trigger the solenoid bar to be released. Decided on having two pins to increase its strength and that if one were to fail there still would be the secondary backup which reduces theft.

Side view of the locking device showing the components held down by a specialised female and male bolt system which is only been created for the maintainence team in charge of the Melbourne bicycle sharing scheme. Note: These cant be bought at Bunnings!!

Rear view of the bicycle housing, the shape easily recognisable and matches well with the bicycle itself having an extrude through the middle to thus help with the aesthetics but also to see the progress of locking and to help light stimulate the base of the plate.

Close render of the controls located on the handlebars. Rear and front brake levers with the cabling reaching their intended brake control. The bell to comply with Australian standards and the front of the handlebars shows the area where the credit card is to be accepted. The levers and rubber grips are easily replaceable and will be seen to be the most damaged item on the bicycle unit itself.

A perspective of the lcd monitor display screen with chrome key lock to let the maintainence officers replace or repair any damaged screens. Again this key is given only to the maintainence team and cannot be purchased at any local hardware shop. The front tyre tread comes out well in this render.

The layout for the front bearing system. The main inner hub is supported by a bearing sleeve on either side which allows the main hub to roll. This is held in place secondarily through the lower set of bearing rollers which fit in underneath to help guide the wheel on a direct path and to help avoid damage from bumps and debris.

The bicycle and its locking device. Has come up well with a great colour scheme used throughout the system. The context use and how it is taken in and out of the unit will be discussed at greater lengths throughout the presentation. The same theme of the 'hole' is used throughout both items tieing them together well.

Front view of the bicycle sharing system with the led clearly displayed on the front tyre. Having the led's low ties it well with the look of the bike and helps prevent cabling issues without having the use of a gyro. All these renders will be further spruced up on photoshop to make sure they are doing the bicycle sharing system justice.

The internal optical ramp for the bicycle as the tyre rolls over the ramp and triggers a sensor the solenoids are told to be released. This is operated via an 'AND' electronic gate, which means only if three or more sensors are covered the solenoid will be released. This prevents things like insects or sticks releasing the solenoid consistently.

Rear view of the adjustable seat unit and the mudguard clamp. The seat can be raised or lowered according to the user so it accomodates for all demographics within the Melbourne city.


